.png)
- Nov 28, 2020
- 2 min read
I'd like to share the stages of Traveler. Both feature a hand-dyed silk organza top layer, with loads of fibers underneath.
Below, you can see hemp fibers which I hand-dyed using Dyna-flo because it's simple, fast and easy to mix colors. This was my first time using hemp and, while not my favorite fiber, it does create it's own unique effect. It's definitely coarser than many other fibers, and therefore useful when you're looking for a bolder effect. This will definitely be seen - no subtlety to it!


This was the first thing I laid down on the quilt, and everything else had to be built up around it. This was a little unnerving because it wasn't necessarily easy to gauge the proper angle and progression from thick to thick line across the quilt. As with many quilts in this series, when elements are lying under silk organza, it's locked in and there's no possibility to return and fix your mistakes. What's done is done and you can only make peace with it.
Next I have the line of hemp fibers stitched down with additional features stitched on top, and the entire quilt has also been quilted down with the first layer of stitching. This helps keep everything in place and the density of quilting regular. What I quilt on top of this first layer generally doesn't affect the flatness of the resulting quilt.
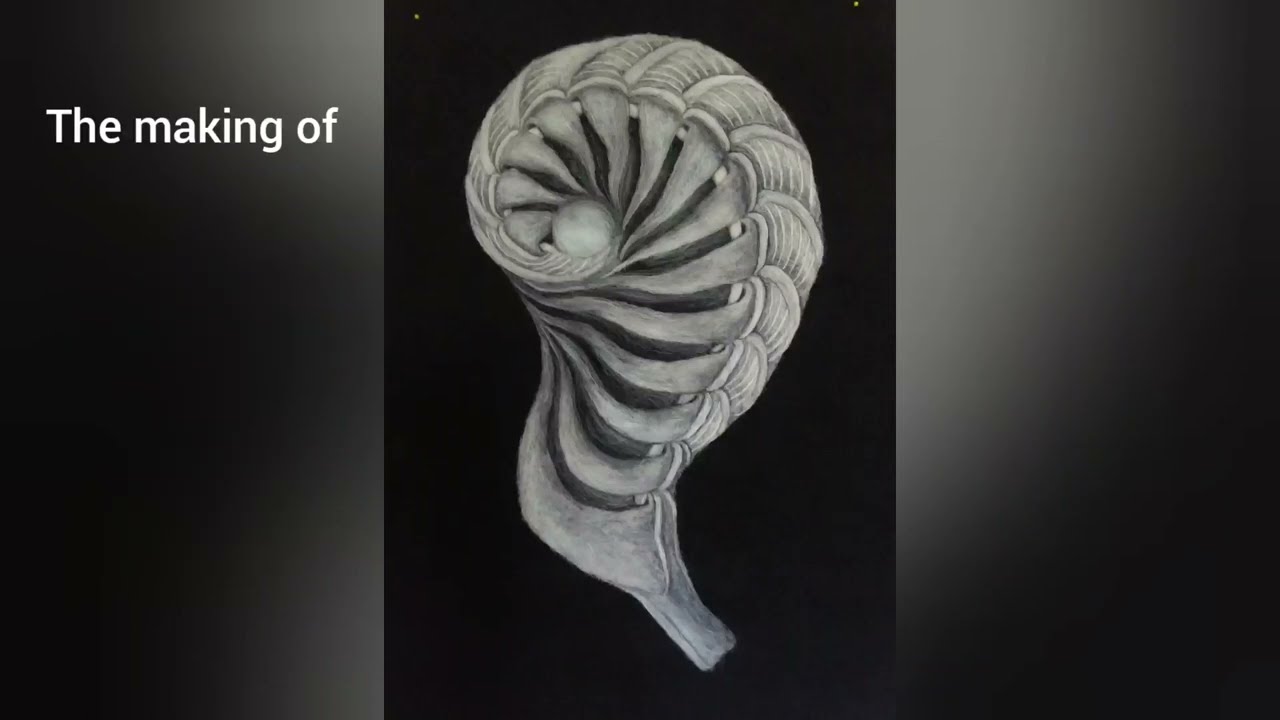
I have also quilted the guide lines for my main feature - the 4D space figure.
While I don't have images of the process, I do remember that stitching the 4D space figure felt like a never ending burden. It was quite challenging because it involved hundreds of thinly spaced, double or triple stitched straight lines, and especially when they overlap, it became quite difficult to keep them straight. Then I finished off this figure with hand embroidery, using two different colors (red and purple) to get a color which would match the polyester thread.


The quilt is finished and now is being stretched so that it will lay flat and I can cut it into the finished rectangle instead of some strange misshapen thing. I lay my foam design board on the ground, spray the quilt with water until it is saturated, then start pinning the inside down and work my way to the edges, always pulling and stretching where needed. When it dries, usually everything remains fairly flat, especially when the quilt was quilted evenly in the first layer, before other things were added on top. After the quilt dries, I can remove the pins and trim the edges.


And here's the piece after it was cut, but before it was bound.

This piece is available for purchase. Visit Robert and Bob Rogers Gallery for more information.
- Nov 25, 2020
- 3 min read
Compaction & Drift, although geological terms, can also be used to describe periods in life. Sometimes our days are packed full with things to do, attempts to be efficient and effective. Sometimes we are aimlessly drifting through our days without purpose. Anyway, however it may be, in the following images I'm going to show some stages of the artwork, Compaction & Drift, as well as another piece which ended up getting cut up and reworked into 9 smaller pieces.
As with Yellow Gulch, described in the previous post, this piece was also first hand-stitched. Here you can see it as a single piece of cloth, without the "quilt-sandwich". The stitching is not finished yet.

Here is the finished piece, complete with machine quilting and binding. You can see that I rotated the work 180 degrees from my original plan. I think I agonized over the decision for a little while first, but I'm sure it was the right decision.


This piece was awarded two prizes: The Cream Award, 2016 Quilt Visions at the Visions Art Museum and the Catherine Hastedt Award for Hand Workmanship at Quilt=Art=Quilt, 2017.
If you're interested in purchasing this work, contact Shea.


MAPS I-IX
Now, on to this next piece, which was eventually broken up into 9 smaller works of art. The story behind this quilt is that I was ready to finish this series and it was going to be the last piece. But I really dislike the period between the end of one series and the beginning of another, while I feel aimless and uncertain about what to jump into next. In an attempt to avoid this period, I decided to simply make this piece as daunting as possible in order to buy myself some time while in parallel, I figured out my next series. This piece took me a month, and it was just long enough to get myself ready for the next move. But, in the end, I decided that there were so many stitches, and not enough contrast, that it was actually a little painful for the eyes to look at it. And being to difficult to discern all the details, it also didn't have much of a visual impact. Therefore I decided to cut it up. I rarely ever do this....in fact, this may have been the only piece which I have dismembered in such a way. But, I think it was the right move and now there are many pieces of smaller, more affordable and accessible works of art.
In this image, you can see cotton threads which I had recently dyed. For this particular series, I dyed the thread using Dyna-flo. I like it because it's easy to blend the colors and you don't need much. It's pretty fast and effective. I am steaming and heat-setting before use.

This artwork was one of the ones which was first machine stitched and then hand-stitched. Although I had a bigger and more professional Brother straight-stitch sewing machine, I very often used my smaller, older Brothers because of their ability to zig-zag stitch. I like the brothers from the 70's and 80's because they're strong, durable, easy to tweak and repair, can use all generic parts, and in general are very reliable.

Part of the work is finished. The top half, which will not have hand-stitching, is quilted in a bit more decorative way. The areas which are intended to have maps lines are quilted in a more utilitarian way, simply to get it done more quickly, since it will be covered anyway.

Already there is some more progress!

A close up of the stitching.

The finished pieces. They can be purchased from Roberta and Bob Rogers Gallery.

- Nov 21, 2020
- 2 min read
In this post, I would like to share the process of how I created these landscape pieces. They are based on the hand-drawn maps of Lewis and Clark. As you can see in the picture below, I was looking to break up the landscapes to make interesting, individual compositions.

I first dyed white perle cotton thread. Here, I have begun the hand stitching. Sometimes I quilted the entire quilt by machine before stitching by hand, because otherwise I had to quilt around all of the individual stitches, which was more challenging. But sometimes the effect was worth the effort, as it caused the hand stitching to pop out even more from the surface. You'll see this effect in a following close-up.

Now I have most of the hand-stitching completed. The extra fabric on the sides of the silk cloth were basted (loosely stitched) onto the silk in order to make it more convenient for the embroidery hoop. The yellow strip at the bottom was there for such a purpose, but in the end I decided that in fact it was a great design element and kept it. That was one of those accidental results which can happen in art making and which can be very fun and exciting.

The piece has now been machine quilted. If you look closely, you can see how there are no machine stitches crossing the embroidery, they go around and among it.

Below is a view of the finished piece. You can see the variations in color from hand-dying the silk fabric and cotton threads. I personally really like this effect, as it's more interesting and adds overall depth.

If you'd like to purchase this work, visit Roberta and Bob Rogers Gallery.